Change the hue / saturation / colour balance of sections of an image as opposed to the whole image:
By using the lasso tool, or alternatively, the pen tool to outline the place you wish to change (in this particular example, the main body of the car, minus the windows, roof and wheels). After having outlined this desired area, you go to the top of the screen select "Layer", "New Adjustment Layer" and "Hue / Saturation" (selected in this example) or "Colour Balance" respectively. Finally, you experiment with the colour, brightness and saturation while preveiwing these changes you've made until you are satisfied!
From this: To this:
Similarly, you can create the same effect by adding an adjustment layer then using black and white to select the areas in which you wish to saturate (black means this won't be changed whereas white means the opposite), for example:
From this: To this:
Tip: you can use the exact same method as that previously explained in order to change the saturation / hue / colour balance of parts of a persons face, so if you decided to do so it is a good idea to select "colourize" before changing the colour because, cosequentially, those you can choose, although more limited, are more natural colours!
Retouch an image of an individuals face through using "Liquify" (unfortunately only available on Abode Photoshop CS6 as far as I am aware) or the "Spot Healing Brush Tool". Here is an example I did following the lesson on Photoshop CS4 Extended:
Age an Image:
Thirdly, through demonstration in the session, I now understand that there are various ways to age an image visually by using photoshop (however you must always remember to introduce a new layer when making any modifications as you may make a mistake): 1) you can paint over the image in black then add, with a very soft brush, a dash of white in the centre, or 2) paint over the image in a mustard colour then lessen the transparency to give the image a worn sort of look. But when it comes to it, if you understand how to do both, why choose when you can add both to an image!
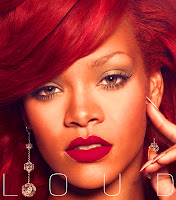
Finally, for the last twenty minutes of this two hour session we were given the task to recreate a Rihanna album cover which was chosen especially by Zoe, this sessions teacher, as we would need to use ALL the techniques we had learnt in order to achieve anything close to this finale image (bearing in mind there are obviously features we were unable to recreate, even with this software available to us for example, the fact her eyes are closed in the original cd cover image):
 My first attempt as I wish to try again, despite the fact that I am fairly contempt with it already!...
Here is my second attempt that I completed in my own time:
Honestly, I think that I this attempt was more successful; although, I used an older version of the same software in order to produce it, "Abode Photoshop CS4" as opposed to that I used to produce my first attempt, "Abode Photoshop CS6". Typically, most people would say the effects you can produce in the older version aren't as good, personally, I feel that this is NOT the case.
In order to produce this image first I lightened the saturation/ hue of the entire image in an attempt to match her skin tone on the original CD cover. Then, I individually selected her hair and her lips and, similarly, adjusted the colour balance and hue / saturation (including making them lighter and darker in general) in these areas , again as an attempt to match those colours present in the original cover to the best of my ability (but ALWAYS remember to select "colourize" to adjust such areas). Last of all, I added the "finishing touches" by using a soft paintbrush to highlight the shadows present on the bottom right side of her face!


No comments:
Post a Comment